Sunday, June 29, 2014

The Week Links: 5


Join me every Sunday when I will share some of my favorite links I discovered in the previous week.
Week 1Week 2Week 3, Week 4

And here is Week 5...


Take a walk though Williamsburg (Brooklyn...not Virginia) with Connie Freedman from Artseat.

Catherine Scanlon and Mandy Collins have released a 44-page eBook titled Mixed Media: A Journey into Visual Journaling + Mail Art. It is available free on Issuu.

Loving this mixed media scrapbook page from Nadia Cannizzo on the UmWowStudio blog. It is all grungy, drippy, splattery, and layery. And she includes a step-by-step video too!

So many artists struggle with time management and actually finding time to make art! Head over to this post on Nathalie Kalbach blog for a very interesting read on how she keeps up with her deadlines, all of life's responsibilities and still carves out time to create for herself.

To celebrate the release of her new book Printmaking Unleashed, Traci Bautista is hosting a virtual book launch party that you can all be a part of. Details on how to play along can be found on her blog here.

Artist Chris Cozen reminds us here how important it is to push the process and step out of your comfort zone.

Monday, June 23, 2014

Orly Avineri Stencil Release Giveaway

StencilGirl Blog Hop and Giveaway

I am over-the-moon excited to be a part of the blog hop to celebrate the newest artist in the StencilGirl family: Orly Avineri. Orly is a journal artist, friend, sometime workshop co-instructor and full time inspiration. 

In honor of Orly, StencilGirl is hosting a blog hop and GIVEAWAY (details below) in which Orly and 9 other artists share creations made using her 5 newly released stencils. I was provided with Orly's 9 x 12 inch Subliminal Skull stencil. I love it - and all of her other designs, as they are real, raw and perfect for art journaling and mixed media work.


Onto the art...

I started with a 7 ½ x 11 inch sheet of cold press water color paper, to which I added gesso, acrylic paint and acrylic glaze to create an abstract background.

Once the surface was dry, I randomly glued on torn bits of vintage paper which was covered with either script or print.

More acrylic paint and glaze were added to the surface, which was then sprayed with black ink.

I continued to work over the surface with paint, gesso and ink until I was happy with the pattern, texture, and dimension on the paper. 

Laying Orly's Subliminal Skull stencil over the sheet, I used a sponge to pounce white gesso through nearly all of the stencil.

I then used a black gel pen to outline the entire white design to add additional depth and dimension.

Once the stenciling was complete, I began to add different elements to different parts of the artwork. I used black rub-on letters to add text to the background and used a rubber stamp to add text to select sections of the white gesso added through the stencil. 

I used many different markers, gel pens, pencils and crayons (both wax and oil pastel) to write text and to create handmade marks, scratches, and designs.


I used the tip of an awl to scratch into the surface.

And I had to have some drips and splatters using acrylic paint.

In the end, I was left with...
Remains of the Day

Onto the blog hop and giveaway...

Stop by the blogs of all the participating artists to see what they have created. While you are at each one, plan to leave a comment because StencilGirl will be giving five lucky people one of Orly's 5 new stencil releases each. The more sites you comment on, the greater your chance of winning. Comments close on Sunday June 29th, 11:59pm Central Time.

Sunday, June 22, 2014

The Week Links: 4


Join me every Sunday when I will share some of my favorite links I discovered in the previous week.
Week 1 
Week 2
Week 3

And here is Week 4...

Anybody who is creative (in other words -- everybody) should read these thoughts on being an artist written by Annie Coe from the blog Blissful-Bohemian, as well as the comments to the post. She speaks to the balance between the work one must do and the need to slow down. 

Shawna Lemay, an author and photographer from the blog Calm Things also shares her thoughts on the challenge of being an artist and writer in our world today. Her words are spaced between stunning images of used paint brushes and though-filled quotes.

For all the painters out there, Wen Redmond has an interesting post with many helpful tips about alternatives to clogging your sink when you need to dispose of your acrylic paint.

I am inspired by the beauty of the work, the studio and the photography of artist Mae Chevrette on her blog To Go into the World. Love those blues!

Thinking of self-publishing a book? Biz Ladies has a post on Design Sponge that includes some good advice that hill help get you started.

Liz Steel has a wonderful post about the tools she uses for sketching, which includes suggestions for pens, pencils, brushes, sketchbooks, and other supplies.

Friday, June 20, 2014

Wednesday, June 18, 2014

The "Inside" Scoop

I am excited to be a guest designer on the PaperArtsy blog. PaperArtsy is a UK-based company that manufacturers rubber stamps, designer paper, and paint/paint-related products. But they are so much more including a community that is represented online by a blogYouTube channel, Twitter feed, and Pinterest boards.


Head on over to their blog for a step-by-step tutorial on how I combined PaperArtsy products (including Fresco Finish Paint, Grunge Paste, and rubber stamps) and my stencils from StencilGirl Products to create Inside. The tutorial includes three different stenciling techniques. While you are there, take a look around. And stay tuned for another guest project from me in August.

Monday, June 16, 2014

Monarch Book Cover

Monarch

I often use vintage book covers to create new books from scratch. In my stash is this beautiful cover, with naturally-aged marbled paper and leather accents. It seemed to me that elements from Spellbinders A Gilded Life collection would be the perfect match.

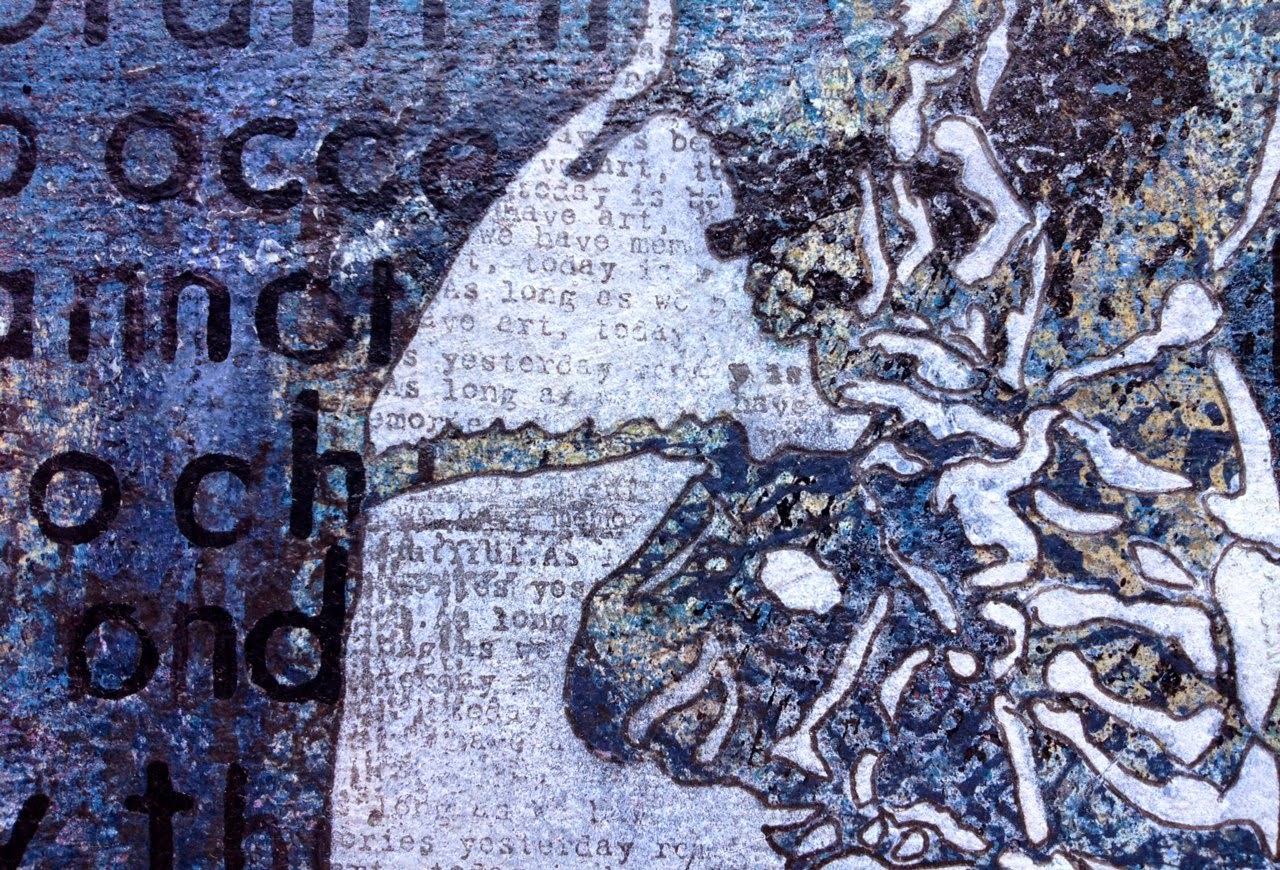
I started by cutting and embossing pewter foil paper using the Petite Monarch die.

With a love of metal accents, I decided to attach the die cut using both adhesive and metal brads. I lined up the die cut to the leather edge of the book cover and marked six holes with a pen using the pre-cut holes in the die cut as a guide.

Using an awl, I created holes through the cover to allow for the brad prongs.

Both glue and the metallic brads will hold the die cut to the surface of the book cover.

I distressed the die cut by running a sanding block over the embossed surface and adding some matte black paint using my fingers.

Using Spellbinders Antique Corner die,  I cut and embossed the same pewter foil into a beautiful, filigreed shape. My idea was not to use it as a corner though.

I used the Antique Corner die cut as a template and cut the same shape out of a piece of hand painted paper that I had. 

I backed the die cut with the paper and then distressed the foil as above, with a sanding block and some matte black acrylic paint.

I adhered this piece to the edge of the book cover, opposite to the side of the Petit Monarch die cut.

At this point in the process, there is how the book cover looked.

Continuing to embellish the cover, I used 5 elements from Spellbinders A Gilded Life Relics -- 2 of the same elements from set A and 3 of the same elements from set B.

These elements were glued horizontally onto the points of the Petit Monarch die cut on the edge of the book cover.

To match the aged looked of the book cover, I distressed the Relics using a sanding block and a bit of iridescent bronze acrylic paint.

My next step was to create corners for the book cover using the same handmade paper I had chosen earlier. I cut out 2 corner shapes using 1 die from Spellbinders Gold Corbels and Accents set.

These were then glued onto the upper and lower right corners of the book cover.

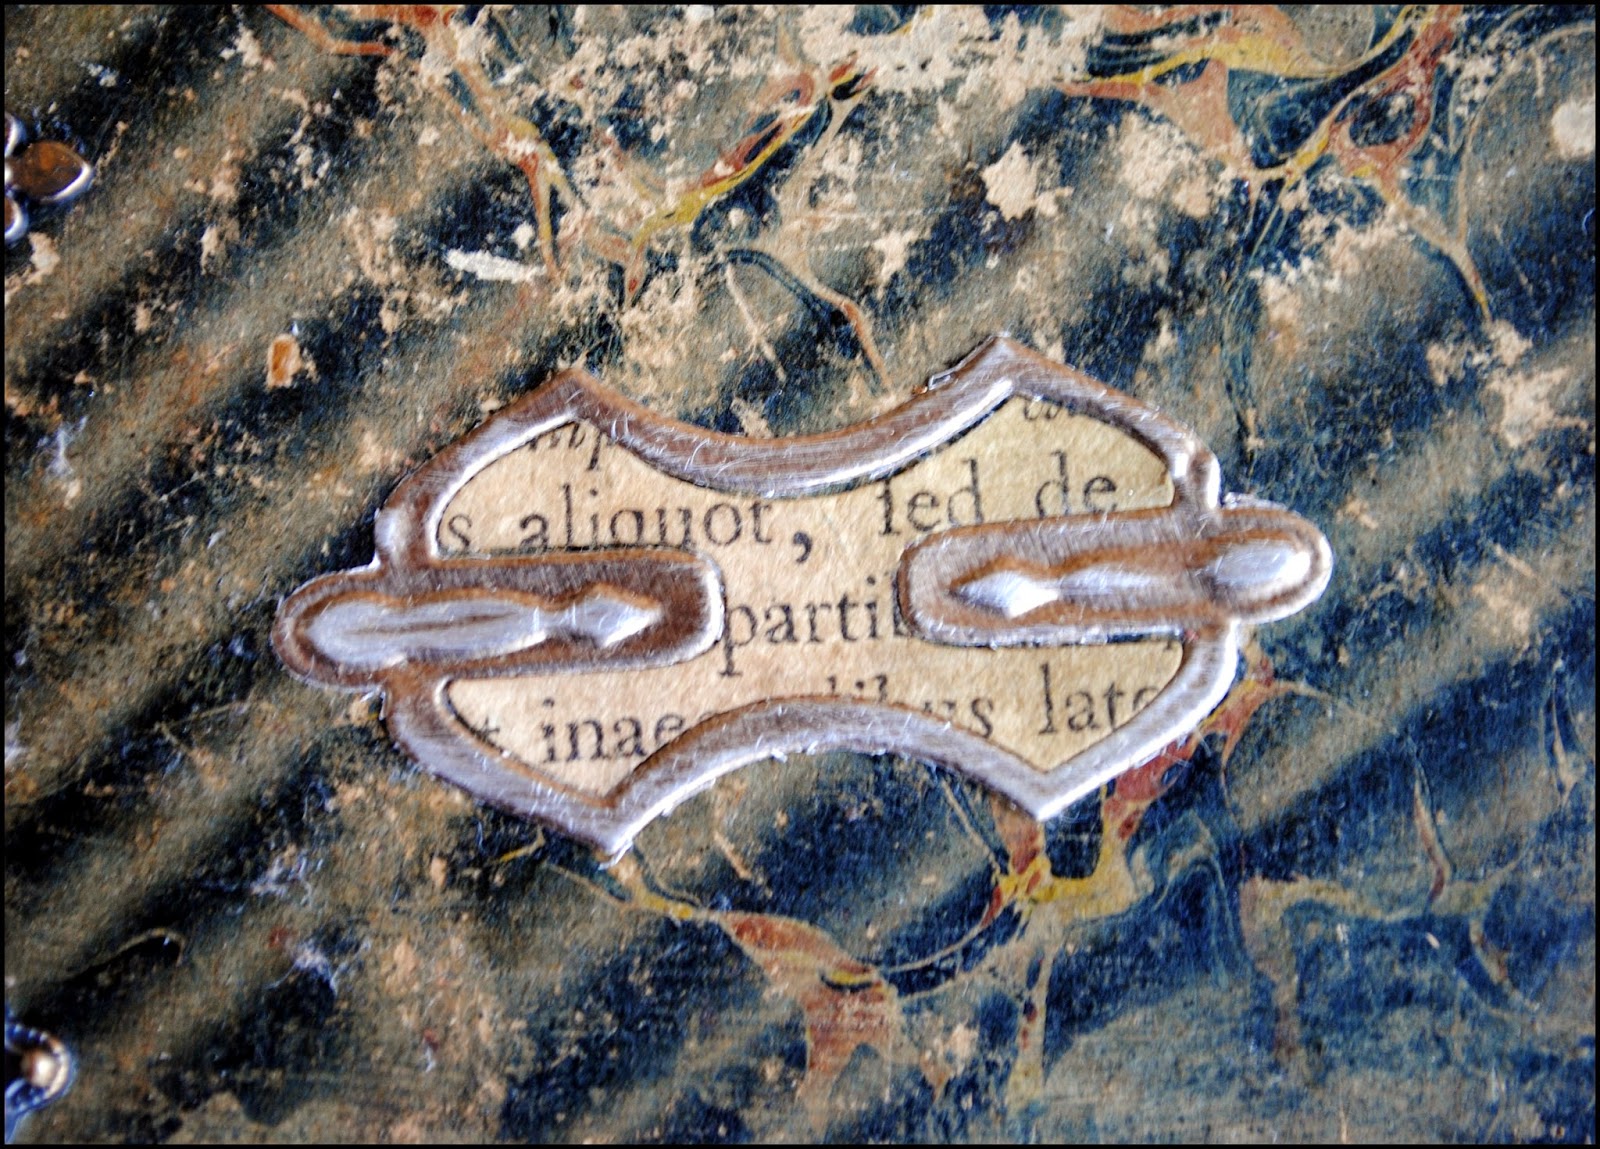
The last element for the book cover was created by using die #1 from Spellbinders A2 Filigree Delight. Two pieces of pewter foil were cut and the outer portion of the die cuts saved. In addition, a vintage book page with Latin text was cut into 2 pieces using the same die, but only the inner portion of the die cuts were used for this project.

The foil was distressed with a sanding block and the paper was altered with dye ink.

The two parts of the die cut were put together and both were adhered to the book.

Now complete, my project - titled Monarch - will now be waiting to become the cover of the next hand bound book I make.


Monarch
----------------------------

Supply List

Spellbinders Paper Art Supplies:

GC-001 Spellbinders® Grand Calibur® Die Cutting and Embossing Machine
GC-015 Spellbinders® Grand Calibur® Junior Magnetic Placement Mat
GLLD-001Spellbinders® A Gilded Life Petit Monarch Die
S2-072 Spellbinders® Shapeabilities® Antique Corner Die 
S4-432 Spellbinders® Shapeabilities® Gold Corbels and Accent Die 
S5-177 Spellbinders® Nestabilities® A2 Filigree Delight Die
GLR-001 Spellbinders®A Gilded Life Relics A
GLR-002 Spellbinders®A Gilded Life Relics B
GLF-001 Spellbinders® A Gilded Life Foil Pack

Preferred Promotional Partners: Tsukineko® Memento Dew Drop Dye Ink Pad, Imagine Crafts® Inkblushers Sponge

Other: vintage book cover, hand painted paper, vintage book page, pen, awl, metal brads, sanding block, acrylic paint, adhesive, scissor